Brewing
Coffee Brewing Instructions
In this section of our website, we are going to talk about the basics of brewing good coffee. We would like to demystify the coffee brewing process and make it easy for anyone to make gourmet coffee at home. Making coffee at home has many advantages:
- It saves you time. You don’t need to drive to the coffee shop for an excellent cup of coffee.
- It saves you money. Even though your initial investment of buying a coffee maker and coffee grinder might set you back a little, in the near future you will be saving money! Just think how many pounds of fresh roasted coffee (which translates into many cups of coffee) you can buy for the price of a few cups of coffee. Also, with the price of fuel being so high, the less driving you have to do the better!
- It allows you to become the coffee expert. With a little time and practice, you can wow your friends with your excellent, top quality coffee! Use your imagination and create your own signature coffee drink!
There are many different methods of brewing a good cup of coffee, and we would like you to be the judge of which is best. We understand that there is not one technique that is right for everyone. You should choose the one that you prefer, according to your needs and preferences. We are going to give you the information that you need to make an informed decision. Do you like your coffee mild or more robust? Do you like a plain mug of hot coffee, or a small shot of rich espresso? There are so many options.
Coffee Brewing Basics
There are a few basics that apply to all brewing techniques that we are going to touch on before talking about the specific brewing methods.
Fresh Roasted 100% Arabica Coffee
Arabica coffee is a type of high quality coffee that is grown at an elevation of 3000 – 6000 feet, close to the equator. Many coffee connoisseurs will not drink anything else. This is all we roast at San Joaquin Coffee Co. since we believe in using only the best!
Coffee beans are best when used within 10 days of roasting. If you are going to store them, put them into an airtight sealed container, such as a canister or glass jar with lid. Then keep them out of the sunshine and away from heat.
Coffee Grinders
Some people think that grinding their own beans is a waste of time. It does take a little bit more time, but it greatly affects the quality of the coffee. When the coffee bean is still whole, it acts as its own storage container, trapping the flavor inside. As soon as it is ground, the air attacks the flavor and quality of the coffee. So do yourself a favor, and grind your coffee just before brewing.
There are two common types of grinders, blade and burr.
- The blade grinder is very inconsistent, giving you some tiny grounds, some large, and a lot of others somewhere in between. A consistent grind is essential to making good coffee. This type of grinder also has a tendency to heat the coffee as it grinds, which compromises the quality of the coffee. Obviously we do not recommend this one.
- A good quality burr conical coffee grinder provides a very consistent grind, without heating the coffee in the process. This is what we recommend using.
Fresh Cold Drinking Water
When you consider the fact that the majority of your cup of coffee is actually water, you realize why it is so important to use good tasting water! We recommend using filtered drinking water. You can use a filter system that fits onto your tap, a pitcher with a filter, or you can purchase good tasting, filtered, drinking water.
Correct Water Temperature
The perfect water temperature for brewing coffee is 195 – 205 degrees Fahrenheit. If you are heating water in a kettle or pot, this is water that is just off the boil about 20 seconds.
If you are using an auto drip coffee maker, check the manual and see what temperature your machine brews at. If the water is too hot (boiling), it will be over extracted and you will have bitter tasting coffee. However, if the water is too cool, you will have an under extracted cup of coffee that is weak and flat.
Correct Brewing Time
The ideal length of time for the hot water to be in contact with the ground coffee is 3 – 4 minutes. That is important if you are using a manual brewing method such as the French press, where you can carefully control this.
Filters
We prefer to use a metal mesh filter instead of the paper filters for several reasons:
- Taste. The paper filters taint the flavor of the coffee. And for coffee purists this is just not acceptable!
- Go Green! We are doing all we can to be eco-friendly. This is one easy thing we can add to our list!
- Save Money! Yes, the initial purchase costs more, but when you are brewing a lot of coffee, its pays for itself pretty soon!
Keeping Equipment Clean
Always wash your equipment with hot soapy water. Coffee has a lot of oil in it, which can build up in the equipment. This oil will turn rancid over time, and then you will have bad tasting coffee!
Brewing Methods
French Press Coffee
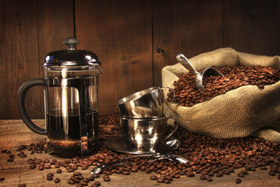
Gourmet coffee is only minutes away in your very own French press! These devices get the most flavors from your coffee beans and produce a rich full bodied cup of coffee. The French Press method of brewing coffee is often chosen by coffee tasters and other people who are passionate about their coffee.
Since the grounds are steeped in hot water, this extracts more compounds from the coffee, extracting oils which add a creamy rich flavor to the cup. With this method you can expect to find a small amount of sediment at the bottom of your cup, which is all part of the delicious French press coffee experience.
Materials needed:
- French Press
- Good quality burr coffee grinder
- Freshly roasted coffee (preferably within the last 10 days)
- Fresh clean drinking water
- Tablespoon for measuring
- Long handled spoon for stirring
- Electric kettle, or pot to boil water
- Timer
- Put water on to boil, approximately 1 cup of water for every cup of coffee you want to make.
- While the water is heating, grind your coffee beans at a coarse grind. Grind 1½ Tbsp. of coffee per 6-ounce cup.
- Add the coarse ground coffeeto the French press.
- Add water that is just off the boil. Add water steadily, saturating all the grounds evenly.
- Quickly stir the coffee using the long handled spoon. Make about 5 stirring motions.
- Put the top on the press with the handle completely extended so that the screen portion is at the top of press, resting on the top of the liquid.
- Steep the coffee for 3 ½ – 4 minutes.
- Slowly and carefullypress down on the plunger. Press down in an even, controlled manner, keeping the plunger rod straight.
- Pour yourself a cup of freshly brewed coffeeand enjoy a rich and complex taste from your coffee beans!
Auto Drip
Gourmet coffee is only minutes away in your very own French press! These devices get the most flavors from your coffee beans and produce a rich full bodied cup of coffee. The French Press method of brewing coffee is often chosen by coffee tasters and other people who are passionate about their coffee.
Since the grounds are steeped in hot water, this extracts more compounds from the coffee, extracting oils which add a creamy rich flavor to the cup. With this method you can expect to find a small amount of sediment at the bottom of your cup, which is all part of the delicious French press coffee experience.
Materials needed:
- Auto Drip coffeemaker
- Fresh roasted coffee beans
- Good quality burr coffee grinder
- Fresh clean drinking water
- Filter, preferably a gold mesh one
- Tablespoon
The first step is toread the instructions that came with your coffee maker. This is because every machine is different. Then follow these basic guidelines:
- Add fresh clean cold drinking water to your coffeemaker. Figure that a cup is 6 ounces.
- Grind your coffee just before you are ready to brew. Determine what type of grind is needed for your specific coffee maker. For example, a Bunn brewer tends to brew quite fast, so it needs a coarser grind than other machines. If yours sends the water over the ground coffee at a slower speed, you may want to try using a finer grind to get a good extraction. The finer the grind is, the slower the brewing process, so it exposes more coffee for a more thorough extraction. We recommend starting with the grind indicated on your grinder, and then work from there, using trial and error, enjoying many cups of coffee on the way.
- Add one to two tablespoons ground coffee to your filter.
- One thing to consider when deciding how much ground coffee to add, if you use too few grounds, they get over extracted, and you will end up with a bitter taste to your coffee.
- Begin brewing.
- Brew only enough coffee to drink fresh. Coffee should be served immediately. If you are planning to leave it sit for a while, use a coffee maker that has a thermal carafe to keep the coffee fresh without burning it.
Note: Your coffee maker should maintain a water temperature between 195 – 205 degrees Fahrenheit for optimal extraction. Colder water will leave you with flat, under extracted coffee, and water that is too hot will cause over extraction, giving your coffee a burnt or bitter flavor.
Percolator
Almost any coffee expert will tell you that the best way of making coffee in a percolator is to begin with tossing your percolator in the trash bin. We at San Joaquin Coffee Co. however, are interested in helping you make the best possible percolator coffee. Some people love the taste of percolator coffee and wouldn’t trade it for drip coffee.
For some, it brings back nostalgic memories of sitting around the campfire, or sitting in Grandma’s kitchen drinking coffee. Also, for making coffee for a crowd, an enormous percolator is the way to go.
We believe that with using very fresh, great quality coffee, and following some important tips, you can have excellent coffee using this method.
Materials needed:
- Coffee Percolator, comes in many sizes, both electric and non electric
- Very fresh, good quality coffee beans (100% Arabica a must!)
- Fresh cold drinking water
- Tablespoon or ½ cup measure, depending on size of urn
- Filter
- Good quality burr coffee grinder (If on a camping trip, use a small hand operated grinder.) Freshly ground coffee is the key ingredient to making your “perk” proud!
- Make sure the percolator is clean. Wash thoroughly with hot soapy water every time you use it. Be sure to clean the stem or metal tube with a narrow brush or pipe cleaner. Otherwise you will land up with a lot of buildup in there, including oils from the coffee, and eventually these will turn rancid and taint the taste of your coffee.
- Put the coffee stem (the hollow metal tube) in place, fitting into the center of the bottom of pot.
- Fill with as much clean fresh drinking water as needed. Remember that 6 ounces is a cup in coffee-speak. Do not fill past line on stem where filter basket will rest.
- Grind 1 – 2 Tbsp. of coffee for every 6 ounces of water. Use a coarse grind, just a bit coarser than you would for French Press. If you use a regular coffee grind, you will end up with sediment in your cup and quite possibly bitter coffee.
- Place the filter in the basket, and then add coffee grounds.
- Fit the basket inside the urn.
- Electric – Plug the percolator in and turn on. Now let the perk do its work…
- Non-electric, stovetop or campfire – Put it over a low flame and watch carefully. When the coffee first begins to hit that little glass bubble, either turn the heat down or move to cooler part of fire.
- Put the coffee stem (the hollow metal tube) in place, fitting into the center of the bottom of pot.
- Watch the pot carefully, and listen for the “perking” to stop. As the liquid approaches boiling temperature, the perking sound stops. At this point remove lid from percolator and remove entire filter system from the pot.
- Carefully pour your very hot coffee into a cup and ENJOY!!!
- Note: If you are using a very large electric percolator, be prepared that it can take up to an hour to brew such a large pot of cold water. On most electric models, there is a light that comes on after the coffee is ready.
- Carefully pour your very hot coffee into a cup and ENJOY!!!
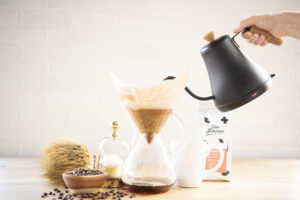
Chemex Coffee Brewer
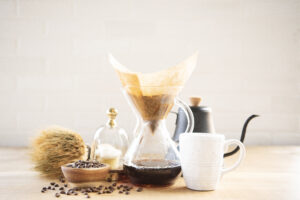
If you are looking for a superior drip brewing system, have a lot of patience, and enjoy a real hands on coffee experience, the Chemex might be just what you’re looking for!
The taste of the coffee that is brewed using this method is similar to the auto-drip, although since it is brewed much slower, and you have control over the water temperature, you end up with a much richer cup of coffee.
Although not as rich as French press coffee, it should not have any sediment in the bottom.
Materials needed:
- Chemex Coffee Maker
- Kettle or pot to boil the water
- Freshly roasted coffee beans
- High quality burr coffee grinder
- Tablespoon for measuring
- Special Chemex filters (which are unbleached and much thicker than regular filters)
- Open the Chemex filter into a cone. One side will have 3 layers, the other side 1. Place the cone in the top of your coffee maker.
- Heat water,,figuring that a cup is 6 ounces, and then add a little extra for wetting the filter.
- Use hot water to wet the filter. This will remove the paper taste. Then turn the coffee maker upside down and drain the water.
- Grind fresh roasted coffee beans,using 1 ½ Tbsp. ground coffee per 6-ounce cup. Grind the coffee on a medium grind, like you would for Auto Drip coffee. If your coffee is too weak, add more coffee or use a finer grind. If the water is getting totally clogged in the coffee grounds, use a coarser grind.
- Place the ground coffee in the filter.
- Remove boiling water from the heat until it just stops boiling (195-205 degrees F) and pour a small amount of water over the grounds, just enough to saturate them.
- Gradually pour in the rest of the water, using a circular motion, keeping water one inch or more below the top of the coffee maker. Stop pouring when you have brewed the desired amount of coffee.
- After all the water has passed through; discard the filter and coffee grounds.
- Enjoy your hard earned cup of coffee!
Cold Brew Coffee
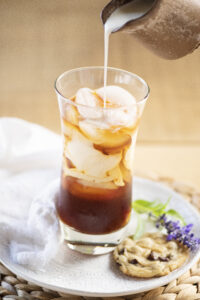
This method of brewing the coffee using cold water and letting it sit at room temperature for up to 12 hours produces a rich, smooth concentrate that is much less acidic than coffee brewed with hot water, and two to three times stronger.
This concentrate can be stored in the refrigerator for up to two weeks and can be used to make many iced coffee drinks, hot coffee, or in cooking.
There are many different ways of making cold brew coffee, and many different coffee makers out there are designed specifically for cold brewing. You can also improvise with what you have on hand, which is what we are going to give you directions for.
Materials needed:
- French Press coffee maker
- A container for the finished brew, a pitcher or glass jar with lid
- Stainless steel kitchen strainer
- Cheesecloth
- Good quality burr coffee grinder
- Fresh drinking water, cold or room temperature
- Fresh, dark roasted coffee beans
- Measuring Cup
- Long handled spoon for stirring
-
- Grind the coffee beans medium coarse, about halfway between auto drip and French press grind.
- Use a ratio of 4:1 for water to ground coffee. For example, if you have an 8 cup French press, you will use 1 cup of ground coffee and add 4 cups of water. (Now we are using the conventional cup measurement of 8 ounces per cup.)
- Measure your ground coffee into the French press, using the 4:1 water to coffee ratio. Add the fresh drinking water.
- Stir the mixture with a long handled spoon until there are no lumps.
- Place the top on the press, leaving the handle extended so that the plunger sits right on top of the liquid.
- Leave on the countertop at room temperature for up to 12 hours. Some people say that 3 – 4 hours is long enough, but we like it brewed longer so it is stronger.
- After the coffee has brewed, slowly and carefully push the plunger down on the press.
- Line the metal strainer with a small piece of cheesecloth and set over the pitcher you want to store the concentrate in.
- Pour the strained coffee from the French Press over the cheesecloth lined strainer into the pitcher.
- Use your concentrate to make your coffee drinks! See our recipe section for ideas how to use your concentrate.
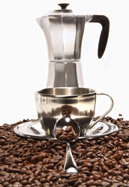
Espresso
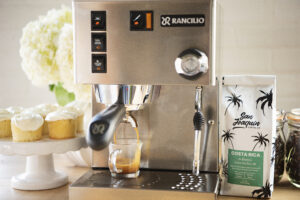
Espresso is a small serving of very thick, rich brew topped with a foamy cream called “crema”. Espresso is made by forcing hot water through a compacted puck of finely ground coffee for about 30 seconds. That is the short version.
There have been books written on the subject of the perfect shot of espresso, but we are going to give you just a few basic tips to help you brew up that perfect shot of espresso. If at first you don’t succeed, don’t give up! There are a lot of things that can affect the final quality of your espresso.
Once again, there are many machines out there that will make espresso. The challenge is to find the right one for you and your preferences, at the right price! So, once you have researched and purchased your machine, read the manufacturer’s instructions and follow them. Then begin experimenting to find out what works for you!
We are not going to give step by step instructions on this method, since there are so many variables depending on the machine that you are using; rather we are just going to give you some helpful tips:
-
- Grind coffee beans just before making the espresso, preferably within a minute or so of brewing.
- Always use fresh roasted coffee. Now, most people will tell you to let fresh roasted coffee beans “rest” for a few days before using them for espresso. That is due to the gas that most beans emit for several days after roasting. Our unique “de-gassing” method makes our beans suitable the same day for brewing espresso.
- A fine grind works best. If you are having trouble with the espresso coming out too slowly, try a coarser grind. If it’s coming out too fast, try grinding finer.
- Use a good espresso roast coffee. Many companies over-roast their beans which makes a bitter brew. Ours is roasted lighter than some, to preserve the aroma and sugars in the coffee. Our espresso is never bitter.
- Use fresh, cold drinking water. We cannot stress enough how important this is to good espresso. Remember that a good portion of your espresso is water, so if you have bad tasting water in your brew, no matter how good the coffee is, the end result is no good.
- Tamp your coffee with about 20 – 25 pounds of pressure. This, together with the grind of the coffee determines how long it takes to pull that shot of espresso and how it tastes.
- It should take about 25 – 30 seconds to pull a double shot of espresso. If it’s taking too long or short, check your grind and your tamp.
- “Crema” is the light brown cream that should be on the top of your shot of espresso. A layer of 1/8 of an inch (3-4 mm) is ideal. If there is not any, or just a small amount, it is probably due to the beans not being fresh, although the grind and tamp do have an effect on this too.
- Serve your espresso immediately in a pre-warmed cup! Enjoy!